If you live in some of the colder sections of the planet, you may have had snow for the last few months. But if you’re in the midwest of the United States, only now are you really seeing any frozen flakes fall in large quantities. If you were to ever need to learn how to use snow chains, now is the time.
Fortunately, they’re far easier to install than they used to be. Quick fit chains can be installed relatively quickly compared to classic sets.
Before You Begin
There are a few things to know and understand before attempting to install a set of chains on your tires.
- Practice installing them BEFORE you need them. That way you know they’re the right size and how to put them on.
- Keep the chains in your car. It would fit in well with a road safety kit.
- Do not use them on wet pavement. They are intended for packed snow/slush and use on hard surfaces can lead to damaging.
- It’s recommended to install the chains on all four tires, but the rear two wheels often work, especially if you have rear wheel drive. Place them on the front two wheels first if you have all-wheel drive.
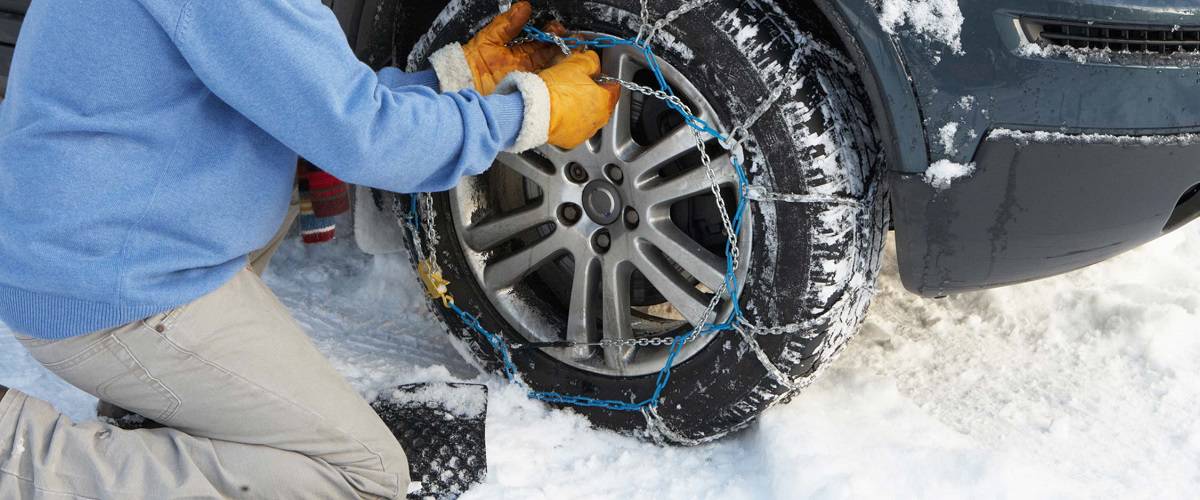
How to Install Snow Chains
- If installing part way through driving, then pull over as much as safely possible and turn on your hazard lights.
- Place tarp or cardboard on the ground by the wheel if you have any, kneel on this to stay dry.
- Unroll the chain, making sure the hooks ends face the ground.
- Push the yellow ends behind and around the tire. Pull the two ends over the top.
- Grab the chains on the sides and pull them in toward the center.
- Hook the red fastener into the link. Make sure the smooth side of the hook is pointing out, as to not damage the tire. Make sure the chains are tight. Don’t worry about extra links on the end.
- Push the cable toward the back of the tire and over the tread.
- Pull tight on the red fastener and draw chain to reduce slack. Lock links into the fastener.
- Pull on the red draw chain to tighten.
- Use rubber end to tighten tire chain
- Do this for all four tires.
- Drive about 15 feet and stop. Go back and re-tighten. The initial motion will reveal any hidden slack.
If that was hard to imagine, we understand. Check out this video if you want a more visual example of what to do.
If it sounds like the chains are loose or broken, and hitting the vehicle, then stop as soon as possible to example them. If broken, then remove. They’re not keeping you any safer that way.
When Driving with Chains On
To avoid damaging your car or chains, keep speeds under 30 mph. Try not to brake suddenly or accelerate quickly. And be extra careful not to bump the curb when parking.
When You’re Done
They’re normally steel chains, which rust when left wet. Remove the chains, dry them, and store them dry
Alternatives
Some folks will opt for an alternative method: plastic/nylon zip tie snow chains. These are special plastic zip ties that go around your tires. They have rigid ends made for creating snow traction. Some find them less effective, but they’re much faster to install. If you don’t want to invest in steel chains, these may be a worthwhile alternative.